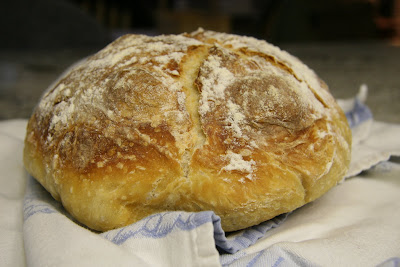

It is with great pleasure that I realize my eldest daughter has become an imaginative cook. In her blog on Janurary 17th she described a stormy Sunday on which she made cream of tomato soup and "artisan" bread for warmth and comfort. I was so inspired by her descriptions of the yummies and the accompanying pictures that I vowed to make the soup and bread the following Sunday.
The recipes looked simple enough, no fancy ingredients required and the name of the bread, Almost No-Knead Bread, promised a quick and satisfying result. I was not disappointed, especially with the bread and so I'm going to share my own photos and the bread recipe here. Feel free to copy and try it yourself. I must give credit not only to daughter, Erin, but also to America's Test Kitchen which produces some of the best recipes for everything from chocolate cake to chicken in a pot. Their recipes are sometimes complicated but they always result in the best food you've ever tasted. Here is the bread recipe:
3 Cups unbleached all-purpose flour
1/4 tsp rapid-rise yeast
1 1/2 tsp table salt
3/4 Cup, plus 2 TBSP water at room temperature
1/4 Cup plus 2 TBSP mild-flavored lager (I used Corona beer because that's what was in the frig)
1 TBSP white vinegar
(The only exotic ingredient here is the beer, but in our household there is always beer, so it wasn't a problem for me.)
If you have made bread before you know that you generally have to melt butter in milk and make sure the milk isn't too hot when you add it to the yeast. In this recipe you just need mildly warm water and you're good.
So the directions are (I have tweaked them to suit myself):
1. Stir flour, yeast and salt together in a large bowl. Add the warm water, beer and vinegar. With a spatula or wooden spoon mix wet ingredients into dry, scraping up flour from bottom of bowl until a shaggy ball forms. It truly will be shaggy and ugly looking and you'll think, ewww, this can't be right, but it is. Just make sure you've gotten all the flour in--I picked it up and squished it around in my hands for a little bit. Now the EASY PART. Cover the lump of dough in the bowl with plastic wrap and LET IT SIT overnight (from 8 to 18 hours!) on your counter.
2. The next day lay a large sheet of parchment paper if you have it or tin foil , which is what I had, in a 10 inch skillet and spray with nonstick cooking spray--I think you could use oil instead--Put dough on lightly floured surface and knead 10 to 15 times (this is such a small amount of kneading that you'll think this is wrong, too, but it works). Shape the dough into a ball and put seam-side down into the paper or foil in the skillet--spray surface of dough with non-stick spray or rub a little oil on it. Let rise until double. (My kitchen on Sunday morning was cold so I heated the oven to 200 degrees, turned it off and put the pan in the oven, leaving the door open. This rising should take about 2 hours.
3. About 30 minutes before baking, put your oven rack at the lowest level so that you can get a big soup kettle in the oven, complete with lid. Heat the oven to 500 degrees with the kettle in the oven. While heating the kettle lightly flour the top of the dough and with a good, sharp knife make a 6 inch long, 1/2 inch deep slit along the top of the dough. Carefully remove the kettle from the oven and remove the lid. Pick up the dough by lifting the paper or foil overhang and lower it into the pot. Be careful of that hot kettle! Reduce oven temperature to 425 degrees and bake, covered, for 30 minutes. Remove lid and continue to bake until loaf is deep brown, 20 or 30 minutes more. Tap with your knuckles--if it sounds hollow it's done. Carefully pull the paper or foil up to remove the bread and cool it on a wire rack.
I think you could use tin foil to cover the pot if your pot has a plastic handle. I'd say this recipe is pretty forgiving--doesn't make much difference what you do as long as you can get it to rise--make sure you have fresh yeast. The bread ends up being really crusty on the outside and nicely soft, but hearty, on the inside. It's a finer bread than you'd think with only a minute or two of kneading and it makes wonderful toast. Don't forget the Adam's Peanut Butter!
Thanks to my daughter this bread is going into my recipe notebook and I'll make it often. I think I might try putting some wheat flour in next time, but watch out for wheat flour--a dough hardly ever rises as high when wheat flour is added. If you try this, report back. I'd like to hear if you like it as much as we do.
2 comments:
A note about step 3: if you let the bread rise in the oven, remember to remove it before you turn the thermostat to 500!
Also, hard cider works too :) And I'll have to try rising in the oven because our house isn't warm enough to get a good rise. Your bread looks fabulous!!
Yes, absolutely, take the pan with the bread rising out of the oven before you turn it up to 500!!! It's funny what we take for granted people will understand! The bread is still fabulous. Yesterday I made tuna sandwich with it! Yum!!!
Post a Comment